Quick start
NOTE
If you are a windows user, please use WSL to run this project.
Mode
First, introduce the three different processing modes of this project: (The following description is based on the asr_method="deploy" situation, if you fill in "none" or "api", it does not involve GPU, and you can ignore the description of GPU.)
pipelinemode (default): The fastest mode, requires GPU support, it is recommended to set the segment inblrecto half an hour or less, asr recognition and rendering are executed in parallel, and the video segments are uploaded in p.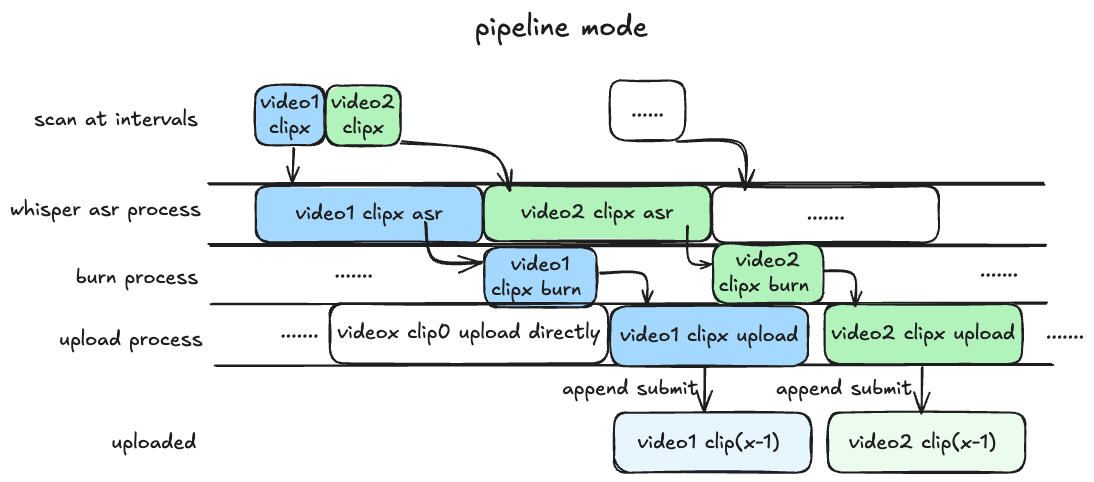
appendmode: Basically the same as above, but the asr recognition and rendering process are executed serially, which is expected to be 25% slower than the pipeline, with lower GPU memory requirements, and a balance between hardware performance and processing upload efficiency.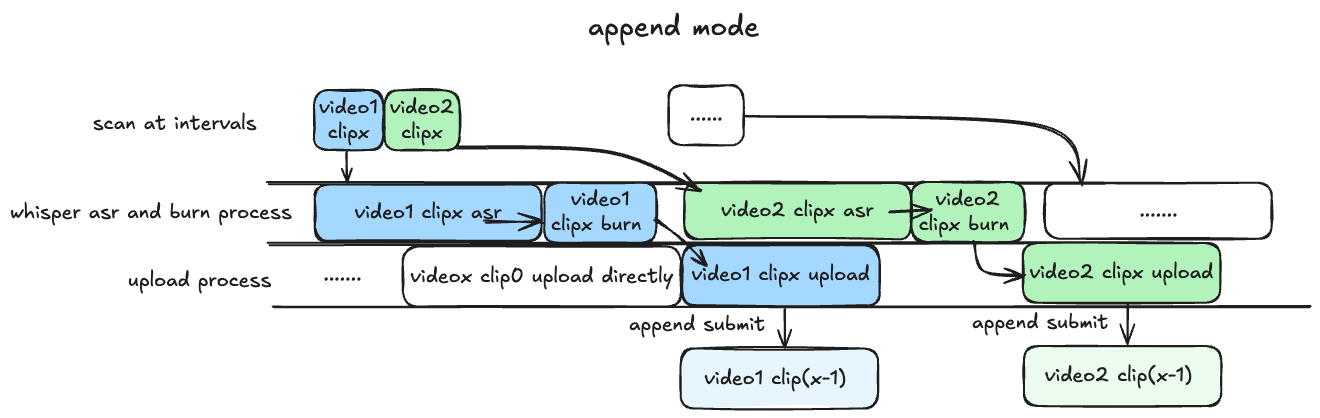
mergemode: Wait for all recordings to complete, then perform the recognition and rendering merging process, the uploads are all complete versions of the recordings (non-P submissions), the waiting time is longer, the efficiency is slower, and it is suitable for scenarios that need to upload complete recordings.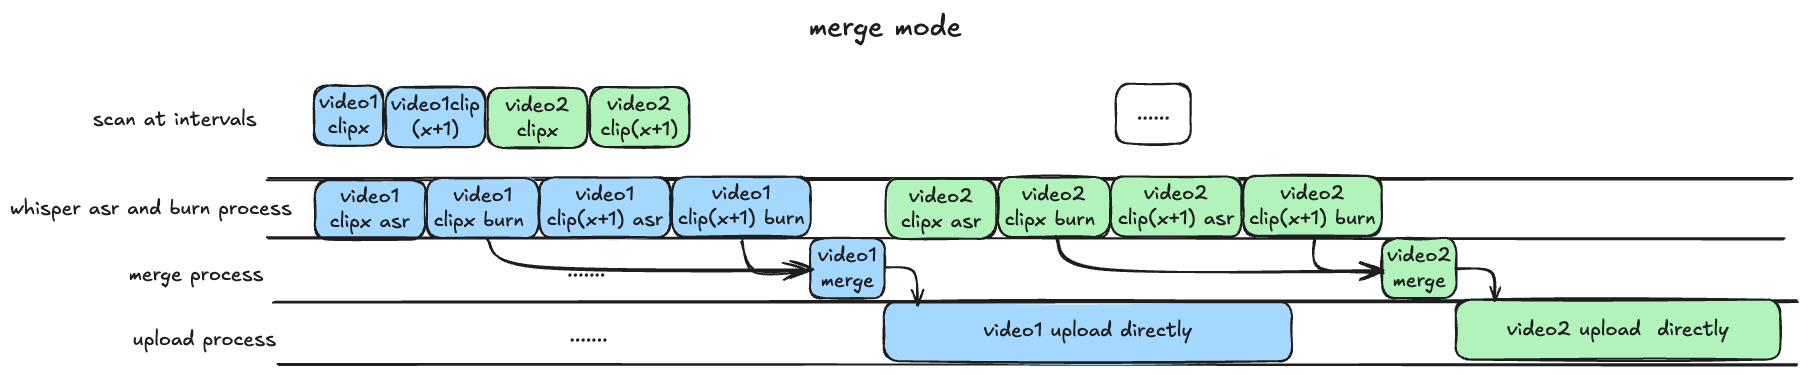
IMPORTANT
All GPU usage requires that the GPU memory be greater than the VRAM required to run the program, the specific calculation method of VRAM can be referred to this part。
Installation
TIP
If you are a windows user, please use WSL to run this project.
0. clone project
Since the project introduces my submodule DanmakuConvert, bilitool and auto-slice-video, it is recommended to clone the project and update the submodules.
git clone --recurse-submodules https://github.com/timerring/bilive.gitIf you do not clone the project using the above method, please update the submodules:
git submodule update --init --recursive1. Install dependencies (recommended to create a virtual environment)
cd bilive
pip install -r requirements.txt
Please install the corresponding ffmpeg according to your system type, for example, install ffmpeg on ubuntu.
2. Configure parameters
2.1 whisper speech recognition (rendering subtitle function)
TIP
- The configuration related to speech recognition is in the
[asr]section of thebilive.tomlfile. asr_methoddefaults to none, meaning no speech subtitle recognition.
2.1.1 Use api method
Set the asr_method parameter in the bilive.toml file to api, then fill in the WHISPER_API_KEY parameter with your API Key.
This project uses the whisper-large-v3-turbo model provided by groq for free tier, with an upload limit of 40 MB (approximately half an hour), so if you need to use the api recognition method, please adjust the video recording segment to 30 minutes (the default is 30 minutes). In addition, the free tier request limit is 7200 seconds/20 times/hour, 28800 seconds/2000 times/day. If you have more needs, welcome to upgrade to the dev tier, more information can be found on the groq official website.
2.1.2 Deploy locally (requires NVIDIA GPU)
Set the asr_method parameter in the bilive.toml file to deploy, then download the required model files and place them in the src/subtitle/models folder.
The project defaults to using the small model, please click to download the required files and place them in the src/subtitle/models folder.
TIP
- Please ensure that the NVIDIA GPU driver is installed correctly
nvidia-sminvcc -V, and the CUDA core can be calledprint(torch.cuda.is_available())to returnTrue. If the GPU driver is not configured orCUDAis not installed, even if there is a GPU, it will not be used, and the CPU will be used for inference, which consumes a lot of CPU computing resources, not recommended, if the CPU hardware conditions are good, you can try. - The model with this parameter requires at least 2.7GB of GPU memory, otherwise please use other parameter models.
- More models can be found in the whisper parameter model section.
- The method of changing models can be found in the changing model method section.
2.2 MLLM(auto slice title generation)
TIP
- The configuration related to automatic slicing is in the
[slice]section of thebilive.tomlfile. auto_slicedefaults to false, meaning automatic slicing is not performed.
MLLM is mainly used for automatic slice title generation after slicing, this feature is default closed, if you need to open it, please set the auto_slice parameter to true and write your own prompt, other configurations are as follows:
slice_durationset the slice duration in seconds (not recommended to exceed 180 seconds).slice_numset the number of slices.slice_overlapset the slice overlap duration. The slice is processed using the sliding window method, details can be found in auto-slice-videoslice_stepset the slice step.min_video_sizeset the minimum video size to be sliced, to prevent slicing short fragments due to connection issues or network波动.
Next, configure the mllm_model parameter related to the model and the corresponding api-key, please register an account and apply for the corresponding api key by yourself, fill in the corresponding parameters, please note that only the model set in the mllm_model parameter will take effect.
| Company | Alicloud | zhipu | |
|---|---|---|---|
| Name | Qwen-2.5-72B-Instruct | GLM-4V-PLUS | Gemini-2.0-flash |
mllm_model | qwen | zhipu | gemini |
API key | qwen_api_key | zhipu_api_key | gemini_api_key |
2.3 Image Generation Model(auto generate video cover)
TIP
- The configuration related to automatic video cover generation is in the
[cover]section of thebilive.tomlfile. generate_coverdefaults to false, meaning automatic video cover generation is not performed.
Use the image-to-image multimodal model to automatically obtain the video screenshot and upload the video cover after style transformation, if you need to use this feature, please set the generate_cover parameter to true and write your own prompt, note that some models only support English, the following parameters need to be configured: image_gen_model and the corresponding api key, please register an account and apply for the corresponding api key by yourself, fill in the corresponding parameters, please note that only the model set in the image_gen_model parameter will take effect.
| Company | Model Name | image_gen_model | API Key |
|---|---|---|---|
| Minimax | image-01 | minimax | minimax_api_key |
| Kwai | Kolors | siliconflow | siliconflow_api_key |
| Tencent | Hunyuan | tencent | tencent_secret_id and tencent_secret_key |
| Baidu | ERNIE irag-1.0 | baidu | baidu_api_key |
| Stability AI | Stable Diffusion 3.5 large turbo | stability | stability_api_key |
| Luma Labs | Photon | luma | luma_api_key |
| Ideogram | Ideogram V_2 | ideogram | ideogram_api_key |
| Recraft | Recraft V3 | recraft | recraft_api_key |
| Amazon | Titan Image Generator V2 | amazon | aws_access_key_id and aws_secret_access_key |
3. Configure upload parameters
Customize the relevant configuration in the bilive.toml file, map the keywords to {artist}、{date}、{title}、{source_link}, please combine and customize the template by yourself:
titletitle template.descriptiondescription template.gift_price_filter = 1means filtering gifts priced below 1 yuan.reserve_for_fixing = falsemeans that if the video appears to be incorrect, the video will not be retained for repair after the retry fails, it is recommended to set false for users with limited hard disk space.upload_line = "auto"means automatically detecting the upload line and uploading, if you need to specify a fixed line, you can set it tobldsa、ws、tx、qn、bda2.
4. Configure recording parameters
IMPORTANT
Please do not modify any configuration related to paths, otherwise the upload module will be unavailable.
The recording module uses the third-party package
blrec, the parameter configuration is in thesettings.tomlfile, and you can also configure it in the corresponding port visualization page after the recording starts. Quick start only introduces the key configuration, other configurations can be understood by referring to the configuration items in the page, and support hot modification.
- The addition of rooms follows the format corresponding to
[[tasks]]in the file. - The default recording quality of the recording module is super-high quality without login. If you need to login, please fill in the
SESSDATAparameter value from thecookie.jsonfile (see step 5) to thecookiepart of[header], the format iscookie = "SESSDATA=XXXXXXXXXXX", after logging in, you can record higher quality video. (Recommended not to login) duration_limitmeans the recording duration, if you use the whisper api recognition, please control the segmentation within 1800 seconds, otherwise there is no limit.
5. bilitool login (persistent login, this step only needs to be executed once)
For docker deployment, this step can be ignored, because
docker logscan print the QR code in the console, and you can scan the QR code to login directly, the following content is for source code deployment.
5.1 Method 1: Login via cookie
Generally, the log file does not print the QR code effect, so this step needs to be installed in advance on the machine:
pip install bilitool
bilitool login --export
# Then use the app to scan the QR code to login, the cookie.json file will be automatically exported
Leave the login cookie.json file in the root directory of this project, and it will be deleted after the ./upload.sh starts.
5.2 Method 2: Login via submodule
Or you can login in the submodule, the way is as follows:
cd src/upload/bilitool
python -m bilitool.cli login
# Then use the app to scan the QR code to login6. Start automatic recording
IMPORTANT
Using the default password and exposing the port on a server with a public IP has a potential risk of exposing the cookie, so not recommended to map the port on a server with a public IP.
- If you need to use https, you can consider using an openssl self-signed certificate and adding the parameters
--key-file path/to/key-file --cert-file path/to/cert-fileinrecord.sh. - You can limit the inbound IP rules of the server port or use nginx etc. to restrict access.
Before starting, please set the password for the recording front-end page, and save it in the RECORD_KEY environment variable, your_password consists of letters and numbers, and is at least 8 digits, at most 80 digits.
- Temporary setting password
export RECORD_KEY=your_password。(Recommended) - Persistent setting password
echo "export RECORD_KEY=your_password" >> ~/.bashrc && source ~/.bashrc,where~/.bashrccan be modified according to the shell you are using.
./record.sh7. Start automatic upload
If you use the deploy method to locally deploy whisper, please ensure that you have correctly downloaded and placed the corresponding model files, and ensure that CUDA is available.
./upload.shLog information
The corresponding execution logs can be viewed in the logs folder, if there are any issues, please submit them in issue, and provide [debug] level logs if there are any exceptions.
logs # Log folder
├── record # blrec recording log
│   └── ...
├── scan # scan processing log [debug] level
│   └── ...
├── upload # upload log [debug] level
│   └── ...
└── runtime # runtime log [info] level
    └── ...
Docker running
The configuration reference is the same as above, the login method is more concise, after starting, the login QR code will be printed in the log, scan the QR code to login.
No GPU version
amd64 and arm64 versions have been built, and the architecture will be automatically selected.
your_record_password is the password for the recording page, please set it yourself, the shortest is 8, the longest is 80.
docker run -itd \
    -v your/path/to/bilive.toml:/app/bilive.toml \
    -v your/path/to/settings.toml:/app/settings.toml \
    -v your/path/to/Videos:/app/Videos \
    -v your/path/to/logs:/app/logs \
    --name bilive_docker \
    -e RECORD_KEY=your_record_password \
    -p 22333:2233 \
    ghcr.io/timerring/bilive:0.3.1
GPU version
sudo docker run \
    -itd \
    --gpus 'all,"capabilities=compute,utility,video"' \
    --name bilive_docker_gpu \
    -p 22333:2233 \
    ghcr.io/timerring/bilive-gpu:0.3.1
Docker Compose
Use image
The default is CPU latest version, if you need to use the GPU version, please modify the image: ghcr.io/timerring/bilive:X.X.X to image: ghcr.io/timerring/bilive-gpu:X.X.X in compose.yml.
docker compose up -dSelf-build
IMPORTANT
If you want to compose self-built images, please change the login method in src/upload/upload.py from LoginController().login_bilibili_with_cookie_file(file) to LoginController().login_bilibili(export=False), otherwise the login process will fail.
The relevant configuration has been written, please replace the 3 to 6 lines of compose.yml with:
    build:
        context: .
        dockerfile: Dockerfile # Dockerfile-GPU
# image: ghcr.io/timerring/bilive:X.X.X # ghcr.io/timerring/bilive-gpu:X.X.Xdocker build
docker compose up -d